Trina Lang Art
  • Home
  • About
  • Previous Projects
    • Mudhouse Residency - Agios Ioannis, Crete
    • Mindful Making
    • Camp Stomping Ground Teaching Artist Residency

DIY Solid Watercolor Palettes

3/27/2019

0 Comments

 
This post exists as a part of a move Towards a Sustainable Art Classroom. Click the link to see more upcycled projects and classroom tips.
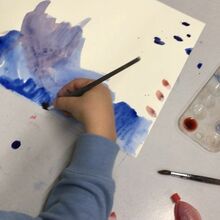
My students and I both have a love-hate relationship with our watercolors. They love the ease of mixing colors and the creative ways of splashing, blending and layering you can achieve. I love that they are easier to store, set-up and save than liquid paints. They hate that the palettes are easily muddied, and I hate that we run out SO fast, leaving us with dozens of empty, plastic trays. 

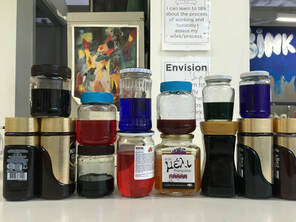
Since last year, I have been holding on to these empty trays, trying to come up with a good use. I've also been saving the dried out markers to make liquid watercolors, and have been working on a way to turn these liquids into re-usable solids that can refill the empty trays. After many trials and plenty of errors, I finally nailed down a recipe that I was able to use as an interactive and engaging STEAM activity with my fifth grade that would help cut down on our plastic tray waste and get us some fresh and fun colors. 

I started with this recipe and then tweaked it to work with the supplies available in my country and my classrooms needs. Below is the recipe with tips, downloads of the observation and instruction sheet for students, photos of the science in action, as well as photos of the finished products. 


watercolor_observation_sheet.pdf
File Size: 59 kb
File Type: pdf
Download File

watercolorscience_instructions.pdf
File Size: 35 kb
File Type: pdf
Download File

Ingredients (per 1 watercolor tray):


- 2 TBSP baking soda
- 1-2 TBSP ​white vinegar
- 1-2 tsp glucose syrup (corn syrup)
- 2 TBSP corn flour (corn starch)
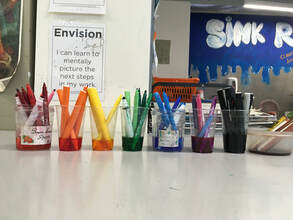
- eyedroppers of homemade liquid watercolors (or food coloring)
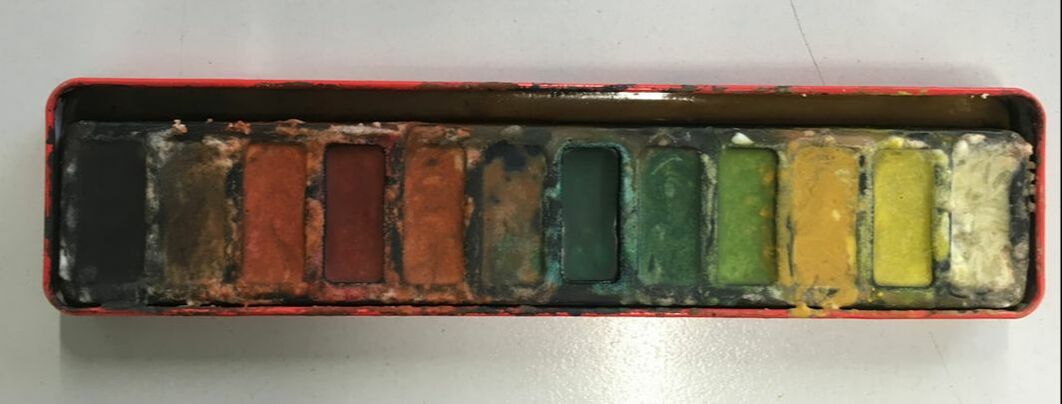
- empty watercolor palettes - even ones that still have bits of paint left!
-Sticks or spoons to stir
-Bucket for mixing

Prep 

To make things easier, and more precise, I pre-measured each ingredient in separate cups, as well as a set of eyedroppers for each pair/group of students. I did not indicate what each material was (but rather labeled with numbers) so that students would be able to hypothesize on their own. 

Procedure

1. In the mixing buckets, combine ingredients 1 and 2 (the baking soda and vinegar) and STIR (this is important). Have students note their observations on their observation sheet. 
​
2. After the solution settles, mix in ingredients 3 and 4 (glucose syrup and corn flour) and STIR! Have your students note their observations again after this step. 
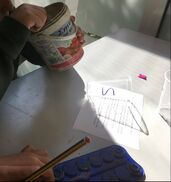
Picture
Mixing ingredients
PictureThis tray is a little too full
3. After the ingredients are evenly mixed, you should have a thick, syrupy solution that is liquid when stirred, but starts to solidify when untouched (effects of corn flour!) Start to distribute the solution evenly in the watercolor tray slots. Try not to fill the holes all the way, you need to leave space! 

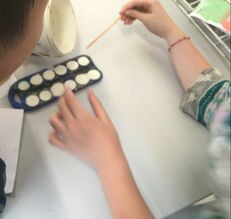
4. Using the eyedroppers, add 2-3 drops of color in each slot. Experiment with color combinations! MAKE SURE you STIR STIR STIR as you add! You may notice the mixture "absorbs" the color and you will need to add more. 
5. Mix each cell one last time to ensure the solution is saturated with color. Then set the tray aside uncovered to dry overnight. 

Results

Our results varied, but was largely successful, especially after the second go-round. We noticed that the constant stirring was crucial to a good result. 
0 Comments

save your markers, make your mark - Upcylced Liquid Watercolors

3/27/2019

0 Comments

 
This post exists as a part of a move Towards a Sustainable Art Classroom. Click the link to see more upcycled projects and classroom tips.


This is a well known secret of the elementary art world - you can turn your dried out markers into vibrant, liquid watercolors. Simply save your dried out markers and soak in water overnight (or if you're as busy and forgetful as me, many nights) and it will soak out the remaining pigment. 


Picture
Picture
I have since come up with many uses for these liquids, and soon hope to develop a use for the leftover, empty marker cartridges. (You can ship markers of any brand to Crayola to recycle, but there is conflicting information about whether their companies practices are actually sustainable.)

Below are some great uses for these liquids:
DIY- SOLID watercolor palettes 
(refill your empty trays!)
Picture
Color mixing experiments (coming soon)
Picture
0 Comments

Community Mosaic

1/25/2019

1 Comment

 
This post exists as a part of a move Towards a Sustainable Art Classroom. Click the link to see more upcycled projects and classroom tips.
Last school year, my second graders spent some time on a unit all about community/art.
Being at an international school with a diverse student body led for incredible conversation with students about what it means to be in community, what communities we all belong to, and how our school becomes its own community made up of many. We discussed many artists who touch on community and representations of community.
My students fell in love with the large scale works of El Anatsui that combine concepts of materiality with ideas and perceptions of community. As a response to his work, the students planned, designed and created this mosaic. The bottle caps we used are materials from our own shared community and the owl is our schools mascot, representing our shared values. It was installed over the summer, and when the students returned in September they were delighted to see all of their hard work on display. 
​
Picture
1 Comment

line olympics

9/18/2018

0 Comments


An interactive and exciting way to practice transitions, clean-up and proper use of a variety of materials

This lesson was completed in grades 1-5 during 40 minute class periods as the second or third art class of the school year. 
The beginning of the school year is often full of excitement, energy and readjustment to schedules and routines - a challenge especially unique to the art classroom. Getting students to readjust to the art room rules, procedures and proper use of supplies doesn't have to be boring - in fact - it shouldn't be! 

​This is a game I use at the beginning of the year to practice a few essential art room behaviors such as transitioning between creating and cleanup, using a variety of materials properly, and using indoor voices. 

The Set up:
 5-6 Stations with a large paper taped to the table or floor. Each station has a unique material to draw/paint/create with. I used:
 - Oil pastels
-Markers
-Crayons
-Watercolor paint
-Collage (scissors, gluesticks, scrap colored paper)
- Colored Pencils 

The Rules:
Students are divided in to five or six groups. Before we begin, I do a brief review of the proper use of each material. Each group starts at a station and has five minutes (or however much time your class period allows to be divided into 5-6 segments) at that center to fill their page with - you guessed it - LINES! Straight, squiggly, parallel or intersecting - it doesn't matter the type - just as many lines as you can! 

After enough time has passed at that station, I will blow my whistle. When the whistle blows, the students are to quickly organize their station (make sure markers have caps, colored pencils are put in their respective color slots, no crayons on the floor, etc) and get in a quick, quiet and even line in the center of the classroom. This helps students to practice transitions - stopping what they are doing and cleaning their area before moving on. It also helps them practice organizing their bodies into a line that isn't crammed, loud or push-y. 

Once they have lined up I will "score" their line by how quick, quiet and neat it is, as well as how well they used indoor voices during work time and how neat they left their stations. I used a scale of 0-10 points, and wrote their score on the board. After scoring the line, the students will remain in the same group and rotate to the next station, and the process repeats so that each group gets to each station, allowing the class to earn up to 50-60 points (with an additional 10 points for clean-up time). I allow the winning class to pick among a list of art prizes (a free-choice day, selecting their next project, etc.)

Clean-up:
After the last rotation, when each group has been through all the stations and the students form their last line, I will give clean-up instructions. Students have an opportunity to earn an additional 10 points for clean-up. The groups are directed to go back to the station they were just at, and clean-up only this station. This reduces clean-up clutter and gives each group responsibility for one area. When their station is clean, they are to return to the center line and sit to indicate that they are done. As always, clean-up is the most hectic part of this activity, so depending on the age of the students I allow between 5-10 minutes to get completely clean. 

The Results:
Though this activity is much more about process over product, the remnants of the line drawings usually end up being quite spectacular! Below are some images of different results. Last year, I saved these to use as class decorations, and then cut them in to smaller squares for students to collage or create cards with. They make beautiful works of abstract art!


0 Comments

Paradise Barrier

2/9/2017

0 Comments

 
This is the second post in Mindful Making, a project done as a Project Zero Artist in Residence
Picture
It wasn't the typical college spring break.  We originally talked about doing the traditional girls-gone-wild, Panama City Beach, bikini-clad trip you see on T.V. and all over Instagram feeds, but fate pulled us towards something much more relaxed and wholesome. So instead of Daytona or Miami, the nine of us piled in to vans and drove in to the night on our way to St. George Island, a tiny recluse in Apalachicola Bay. 
 We happened to find an OSU alum that was willing to rent out his home on the boardwalk for the week, despite the fact that we were all under 25 (most of us under 21 at the time).  As it turns out, we were perhaps the youngest adults on the island. Our new home for the week was surrounded by retired neighbors waving to us from their porches, and the beaches were only lightly scattered with sunbathers or families.  Most of the time, it seemed as if we had the whole island to ourselves. 
We spent our days in the sand and the sea or exploring the tiny surrounding ghost towns further up on the panhandle. We spent our nights cooking elaborate family meals (though pasta night turned out disastrous - another story for another time) and playing music by the ocean under the moon. There was a neighborhood dog that followed us around, digging up crabs and playing fetch with our frisbees. We spent a day hiking in a nearby national park, and we frequented the local ice cream parlor almost as much as we did the beach.

One morning when we were walking in to town, we ran in to an older man on his bike. He stopped us to ask where we were coming from, and if we were there on spring break. He told us about his first time on the island - some time in the 70's when he was on his spring break from college. He fell in love with the island - and with a girl he met that week. Long story short, he and that girl got married, had kids, and are now blissfully retired in the very place that they met. It was a sweet, almost unbelievable story - just one of the many quiet moments I'll always remember from that trip. 

Whenever I think about that spring break, and as I write about it now, I feel that terrible tug of nostalgia at my heart. I know that we, as flawed human beings, have a tendency to remember things as better than they maybe were - glorifying what we no longer have; but there is a big part of me that believes the softness, the serenity and the peace we felt that week is as true and as pure as I remember it to be. 

A lot of things have changed since then. We grew up, we graduated. Couples broke up, friends drifted apart. And we lost one of our own, taken too soon by cancer. It is impossible to remember that spring break without remembering Tyler - his sunburn from that week as bright in my memories as the shining sun. Much like the week itself, his presence was always quiet, calming and comforting. His effect on people was perhaps one of the only things permanent and lasting from that trip, and undoubtably, the most unforgettable. 

As the Boston winter sets in, I've been thinking more and more about our escape to the beach. I wonder what it would be like to go back - if I could ever be like that man we met on the boardwalk and his wife, always trying to return to that spring break magic. It hurts to think about, but I know it would never be the same. Too much has changed, too much has been lost. 

Memories such as these are the ones that pique my artist interest. A memory so pure, so vivid and happy and calm in its entirety, is tainted - not by the instances held within the week itself, but by the fallout and the emotions accrued over the passing years. Our perceptions, our reflections, our past realities are largely constructed by the passing of time and the changing of seasons. 
0 Comments

moving sale

7/3/2016

0 Comments

 
UPDATE: THIS PAGE IS NOT UPDATED! PLEASE CLICK THE "FOR SALE" TAB FOR MOST CURRENT AVAILABLE PIECES

As you may or may not know, I am moving in less than a month! I am so so sad to leave Columbus, but I'm excited for what is coming next. Over the last four years, I have created a lot of artwork, and as much as I love each painting, its going to be a pain in the butt to move to Boston with them all. Those of you who have seen my current apartment know that I have pretty much absorbed all of the wall space with my art, and I'm hoping to live a less cluttered life as I transition to graduate school. 

If you are one of those people that come up to me when you've had a few drinks and say "hey! I love your art. I want to buy some, how do I do that?" Well, here is your chance! 

Below are some images of what I have on hand in Columbus. I've listed dimensions and tentative prices. (There really is no rhyme or reason to how I price things, please feel free to negotiate!!!) If you are not currently in Columbus, but would still like something, thats totally possible, I may just tack on a bit for shipping depending on where you live. 

Please check it out, and if you want something, fill out the contact form below the images! I'll try to get back to you ASAP and we can chit chat on logistics. 

Note: Shipping can cost anything from 15-50 dollars depending on your location!

    Purchase

    If the piece you have selected has choices for prints or framing, please indicate your preference below:
    If the piece you want has options for prints or framing, please indicate your preference here!
Submit
0 Comments

December 11th, 2015

12/11/2015

0 Comments

 
PictureNext Steps, Oil on canvas. The piece sold at the auction.
This past November, the Fresh A.I.R. (Artists in Recover) Gallery hosted their annual Art of Recovery event in Downtown Columbus. The event featured live and silent auctions of work from local and national artists to benefit the non-profit gallery that features art by those affected by mental illness and/or substance abuse issues and works to break down stigma within the community through education. I was so happy to be able donate one of my recent paintings and to be included among the works of many other amazingly talented local and nationally recognized artists. This year has marked many milestones in my own recovery journey, and I'm pleased to share this all with you through my artwork.

​On a side note - I also won $500 in a raffle I was entered in for donating art, so thats cool too. 
​
Check out the event site 
http://artofrecoverycolumbus.com/
for more information, photos and details. 

​

0 Comments

Art Explorations - Identities and Alter-Egos

12/10/2015

0 Comments


Last month, we had discussed identity in relation to materiality and location through the work of Mark Bradford. 
For October's Art Exploration program, we continued to investigate work in Open This End with our young artists that centered on the overarching theme of identity and the creation of self. With Halloween on the horizon, we found it would be appropriate to address some of the more haunting pieces in the show, particular Douglas Gordon's Monster Reborn. Through guided questions and conversation, students interpreted Gordon's reflection of a split personality as a signifier of the complexities in which our own destinies manifest. Gordon's reflection is based on the story of Dr. Jekyll and Mr. Hyde, though students were able to relate to alter egos in their own scope of cultural knowledge - such as Bruce Banner/The Hulk, Clark Kent/Superman, etc. 
For the project portion of the program, students were asked to create an object, prop or extension of their own body that they felt would either enhance or contrast an element of their identity, the way a superhero may have a utility belt or a special costume to help them succeed in fighting crime. With a variety of materials, students created these extensions, and transformed before our eyes! 

Rough Lesson Outline by Hayley Lasko and Grace Galvin
Photos by Ada Matusiewicz
0 Comments

Text and Context in Contemporary Art

10/1/2015

0 Comments

 
 Typically, our Crafternoons program is separate from the art showing in the gallery; we usually focus on a seasonal craft or something decorative made from up-cycled materials. However, because Open This End contains so many rich and layered aspects that intertwine with contemporary creation, we could not pass up incorporating the show in to this month's craft. 
   
One of the major themes in 
OTE and in contemporary art from the last fifty years is the idea of manipulating text and found language by removing them from their original context to alter their meanings and our perceptions of the words. We looked at the featured works of Glenn Ligon, John Baldessari and Andy Warhol for reference as we examined how we could make our own compositions from found language in books, magazines and the world around us. 
0 Comments

Mark Bradford - Community Collage - Art Explorations September 2015

9/19/2015

0 Comments

 
This exhibition has given us as educators an overwhelming amount of art to choose from when designing our lessons. For this lesson, we chose to focus on just one piece of art to create discussion around many different themes such as community, identity and language. Our students, age 4-11 examined the work of Mark Bradford, and his piece in the show, Spinning Man. They were able to make many observations about pattern, materials, texture and line, and were ablet o describe what images it reminded them of. We went back in to the classroom to learn a little more about Bradford and his process, including watching this two minute clip of the artist himself talking about his material choice. This helped the students begin to think about what they may want to include in their own "community collage", which is what we spent the remainder of the time creating. Students made wonderful work out of mixed media such as tin foil, tissue paper, pipe cleaners, yarn, wrapping paper and lots and lots of glitter!

For the full lesson plan, click here. 
Photos  by Ada Matusiewicz  
0 Comments
<<Previous
Powered by Create your own unique website with customizable templates.